
The official 4.4.2 kitkat update for Galaxy Tab 3 is now available. In this tutorial you will know How to Update Galaxy Tab 3 10.1 P5210 to 4.4.2 Kitkat Official. This kitkat update has been released for Galaxy Tab 3 10.1 after a long time. This tablet was released with jelly bean firmware and got the Kitkat update after a long time but in some regions not all. So, many users didn’t get this update and those who didn’t get this update can follow this guide to update their Galaxy Tab 10.1 p5210 to 4.4.2 kitkat official through manual installation. You can also check the availability of this update by going to Settings>>About Phone>>Software Verison>>Check for Updates if shows any update then go for it and it it doesn’t then you can follow this guide to update to update your tablet to the latest version of android manually.
So let’s begin, below is the procedure on How to Update Galaxy Tab 3 10.1 P5210 to 4.4.2 Kitkat Official. Follow thee instructions carefully and also read the disclaimer.
Updating the Galaxy Tab 3 10.1 to Kitkat
This tablet was released with 4.2.2 jelly bean and later got the update of 4.4.2 kitkat but not in all the regions. Many users got this update through OTA but all others didn’t either get this update, so those who didn’t get the new kitkat update can follow this guide to update their Tab 3 P5210 to 4.4.2 kitkat. I will make the whole process as simple as possible. Please note one thing that this update is only for P5210 model, you shouldn’t try this on any other model.

This new kitkat update also brought some new features and changes, the new lock screen, status bar, better performance, improved battery life and much more. So, this will be a pretty awesome update for Galaxy Tab 3 and users will be amazed to feel the response of their tablet after updating to kitkat.
Before proceeding on how to update Galaxy Tab 3 10.1 P5210 to 4.4.2 kitkat official read the disclaimer and necessary instructions before proceeding.
Disclaimer
The following guide is only for Galaxy Tab 3 10.1 model no P5210, do not try this on any other model. If you are completely unaware of this process the you should not do this so, try this at your own risk. You may screw up your phone if you do not do this properly. If something wrong happens with your device then droidopinons.com will not be held responsible for this. If your device is rooted then you will lose root access as this an official firmware.
Necessary Instructions Before Proceeding
- Confirm the model no of your device first by going to Settings>>About Phone>>Model No. Make sure it is P5210 then proceed.
- Backup all the important data like picture, videos, contacts, sms so you may not lose it for any unusual cause.
- Your tablet should be charged above 60% to avoid power failure issues.
- Your PC should have Samsung USB Drivers installed.
- You can install any region’s kitkat firmware on your unlocked Galaxy Tab 3 10.1 p5210.
Material Required
- Galaxy Tab 3 10.1 P5210
- A PC or a Laptop
- USB Data cable.
Download Required Files
Galaxy Tab 3 10.1 p5210 4.4.2 Firmware
How to Update Galaxy Tab 3 10.1 P5210 to 4.4.2 Kitkat Official, Steps
Step-1
- Download the any kitkat firmware from the link above on your PC and extract it to get tar.md5 file.
- Now download Odin and extract it too.
Step-2
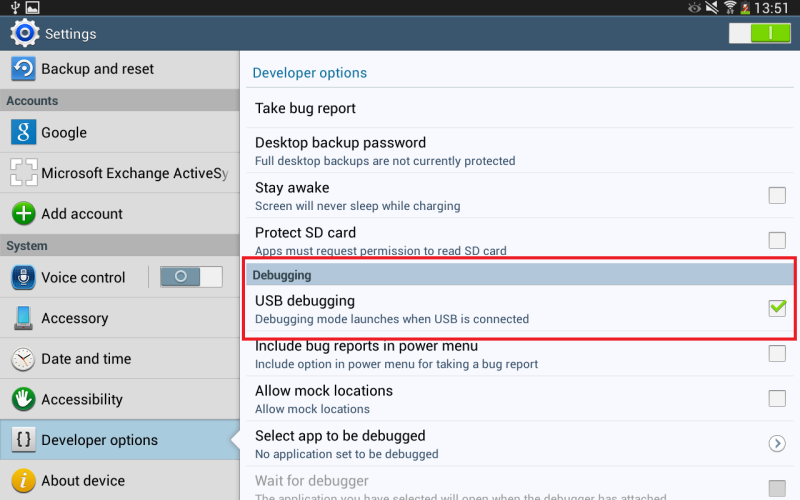
- On your device enable the USB Debugging Mode by going to Settings>>Developer Options. If you don;t find any developer options then you will need to activate them by going to Settings>>About Phone>>Build No, tap on build no seven times to activate developer options.
Step-3
- Now turn of your tablet
Step-4
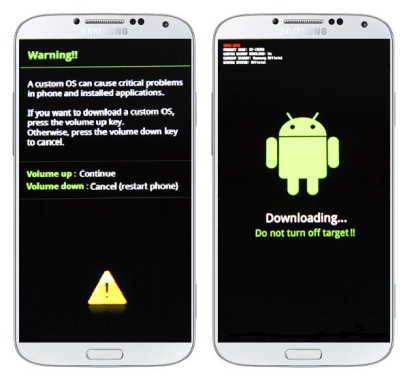
- Enter into download mode by pressing and holding home+volume down+power button for a few seconds. A warning screen will appear. Press the volume up button then to confirm the task.
Step-5
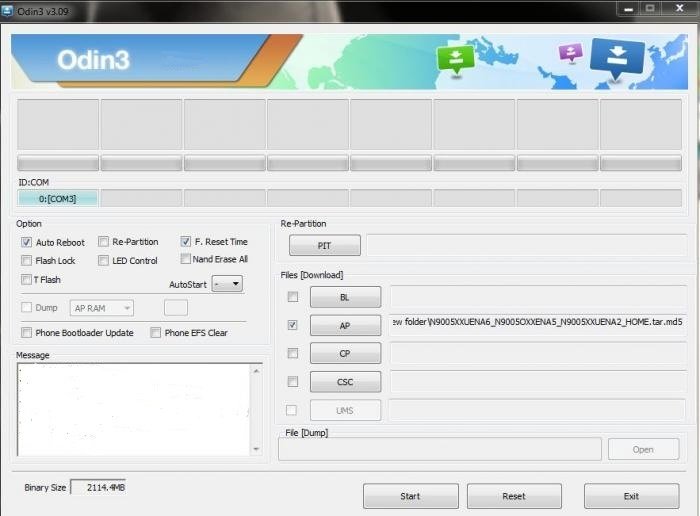
- Now launch the Odin flash tool.
Step-6
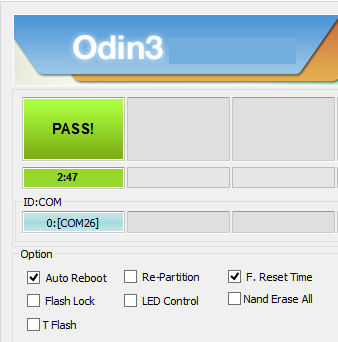
- Connect your device to the computer. The ID:COM box in Odin will turn blue this means the connection is established successfully.
Step-7
- In Odin click on AP/PDA option and select the extracted kitkat firmware which is in tar.md5 format.
- Ensure that Auto Reboot and F.Reset Time options are checked in Odin.
Step-8
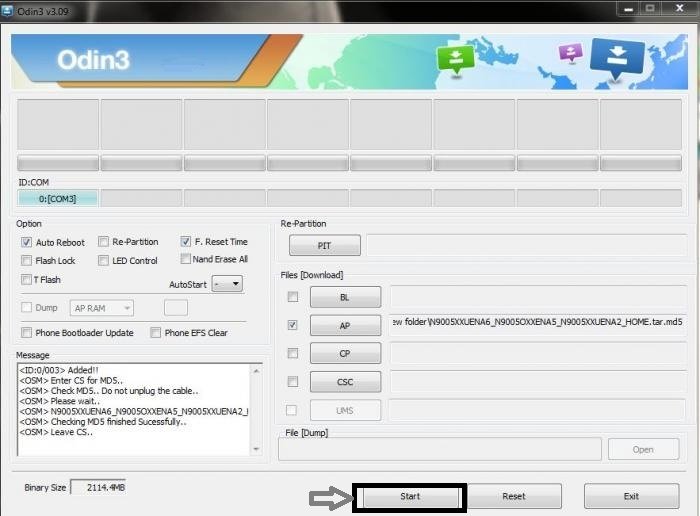
- Review the whole process again for safety.
Step-9
- After all is set, click on the Start button to begin the process.
Step-10
- After clicking on start button Odin will start flashing the firmware. It will take some time to complete the process. So, wait for sometime till the process completes. After completion Odin will show Pass message on the screen.
Step-11
After the pass message, your device will automatically reboot. At first startup it would take some time to show up the home screen. Disconnect the cable when your device boots up.
Note: If Odin stops at any point then disconnect the cable and repeat the process again.
Congratulation, you have just updated your Galaxy Tab 3 10.1 P5210 to the latest version of Android. Hope you our tutorial “How to Update Galaxy Tab 3 10.1 P5210 to 4.4.2 Kitkat Official” and got all the info you needed. If you have any questions then feel free to ask in the comments section.
Fix if Device get Stuck at Boot Screen
It is a common issue that most of the times when you update your device it get stuck at boot animation. This problem can be solved by wiping data/factory reset in the recovery menu. So follow the method below for resolving this problem.
- Press and hold home+volume up+power button for a few seconds until recovery appears.
- Now go down to wipe data/factory reset with help of volume button and select and confirm the task by power button.
- Now again go down to wipe cache partition and select and confirm the task.
- After doing the above process select the reboot system now option to restart the device.

By doing the above process your problem will be solved but remember that all your data will lost by doing the above process.
So, that was it. // Bye !! see you again.
Please like, share and subscribe. Comment to share your views