
Samsung Galaxy Note 2 is a famous Android Smartphone from the famous phone brand Samsung. It was the most popular android phone of 2012. The thing that inspired Galaxy Note 2 users was its features, productivity, power and performance. Galaxy Note was the best in all aspects at that time and now as well and that was the reason why it got so much success.
Now coming to the features and hardware of Galaxy Note 2, it is backed with famous Samsung’s stylus S-Pen making it best for productivity and personalization. Galaxy Note has a very rich performance package enclosed. It has a Exynos Quad-Core 1.6 GHz processor, 2 GB of ram and 16/32/64 GB internal storage with micro SD card slot that supports up to 64 GB. The display is 5.5″ super AMOLED which is very crisp and bright having 720 x 1280 pixels of 267 ppi. Camera is awesome, 8 MP (3264 x 2448 pixels), 1080p at 30fps with auto focus and LED. Front camera is 2 MP. The handset comes in six beautiful colors, Titanium Gray, Marble White, Amber Brown, Ruby Wine, Pink and Blue.
Rooting the Galaxy Note 2 N7100
So, today buddies i will show you how to root your Galaxy Note 2 N7100. Basically rooting enables you to gain access over all the phone’s restricted functions. Rooting the phone removes all the system restrictions and software boundaries. You can enjoy different tweaks, apps on your android by rooting your android. Also you can install custom recovery and custom roms on your android by rooting your phone. An android geek can never live any longer without rooting his phone.
So, get ready guys because you are about to root your Galaxy Note 2
Note
The method below is only for Galaxy Note 2 N7100 model. Do not try this on any other model. This method is for advance users you may mess your phone if you do not do this properly, so don't do this if you are completely unaware of this method. If something wrong happens with your device then Droidopinions.com will not be held responsible for this so try this at your own risk, Thanks.
Disclaimer
Rooting will void your phone’s warranty. The method below works only with Galaxy Note 2 N7100 model. You can root your phone on both stock Jellybean and Kitkat using this method.
Materials Required
- A PC or a Laptop
- Galaxy Note 2 N7100
- USB Data Cable.
Necessary Instructions Before Proceeding
- First of all Check the model of your Galaxy Note 2 by going to Settings>>About Phone>>Model No. Make sure that your phone’s model is N7100.
- Backup you important data like call logs, contacts, sms, images and videos etc to avoid data loss if something may went wrong.
- Your PC should have Samsung USB Drivers installed.
- Your phone should be charged above 50%.
- Make sure your USB Data cable is working good.
Downloads Required
Download CF-Auto Root N7100
Download ODIN v3.09
Download Samsung USB Drivers
How to Root Galaxy Note 2 N7100, Steps
Follow the steps below carefully to root your Note 2 N7100.
Step-1
- Extract the CF-Auto Root that you have downloaded to get a tar.md5 file extension.
- Now also extract odin.zip
Step-2
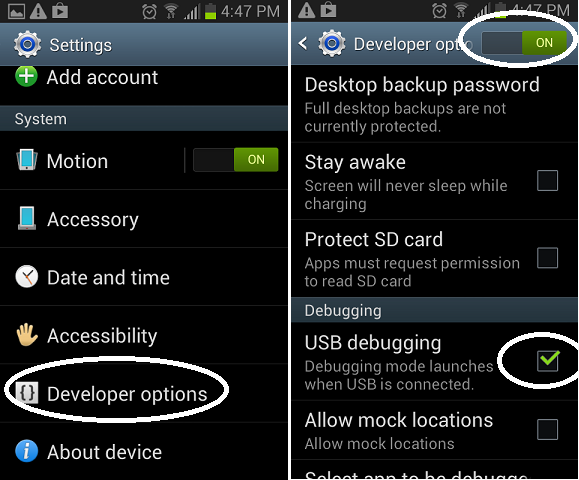
- On your phone go to settings>>Developer Options scroll down and enable the USB Debugging Mode option.
- If you don’t find developer options then go to Settings>>About Phone and tap on Build No seven times repeatedly. This will activate Developer Options on your Phone and then you can enable USB Debugging Mode.
Step-3
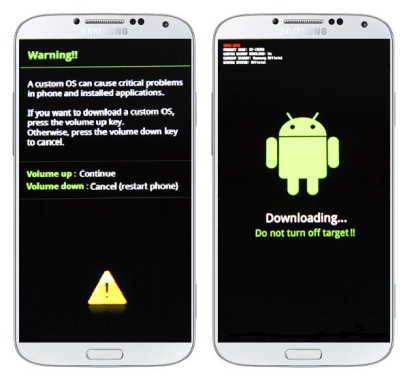
- Now turn off your Phone.
- Enter into download mode by pressing and holding Home+Volume Down+Power button. A warning screen will appear, now press Volume Up button to continue.
Step-4
- Run the Odin that you have extracted in the first step.
Step-5
- Connect your Galaxy Note 2 to the PC, the ID:COM box in Odin will turn blue this means your device is connected successfully.

Step-6
- Now in Odin, click on AP/PDA option and select the extracted CF-Auto Root tar.md5 extension file.

Step-7
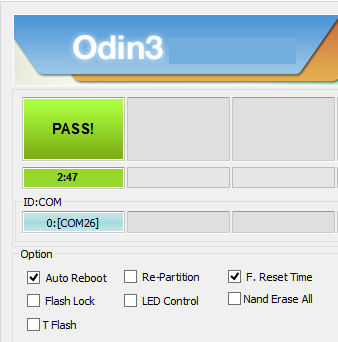
- Ensure that Auto Reboot and F.Reset Time boxes are enabled in Odin.
Step-8
- Check the whole procedure again for any faults or errors.
Step-9
- Now click on the Start button.

- The Odin will start flashing the file. This will take a few minutes to complete.
- After complete Odin will shoe the Pass message.
Step-10
- Your device will automatically reboot after completion, disconnect the cable when you see the home screen.
So that was it guys. Congratulations, now you have rooted your phone successfully and you enjoy different apps that require root access and install custom recovery and custom roms. Thanks for following my tutorial, Enjoy.
Verify Root Access on your Phone
If you want to verify root access on your phone then you can find Super SU app in your apps menu or you can install Root Checker from Google Play store to check the root access on your phone.


Please like share and subscribe. If you have any problem then comment.
Hi! This will erase all my phone data?
There are some games data in my phone that I would like to keep.
Waiting a reply.
You’r data will not lose but there are chances that you may loose data if phone stucks on boot screen after flashing. So, for safety, backup your data. Copy the android folder in phone storage to your pc. All apps and games data is in this folder.