
Galaxy Note 3 Neo was released in 2014, February along the Android OS 4.3 jellybean. It quickly got the 4.4.2 Kitkat update and then after sometime the device was schedule to get the 5.1.1 Lollipop update and currently the latest update running on Note Neo is Lollipop. Rooting is thing that a true Android Geek can’t live without. If you are into Android OS then surely you are because you want Root Galaxy Note 3 Neo that you have and you are absolutely at the right place. I,m gonna show you the detailed instructions about rooting the Note 3 Neo N750 or N7505 so that you are able to understand each and every point to Root Galaxy Note 3 Neo.
Rooting process for your Note 3 Neo is not that difficult. We will root Galaxy Note 3 Neo with CF-Auto Root, the most authentic root developed the famous Chainfire. You will get full root access on your phone with Super SU installed. The process is easy, newcomers can also do this easily by following the instructions carefully.
Rooting Galaxy Note 3 Neo N750 or N7505
Rooting is a process by which users gain access over the system’s internal sources and its permissions. All the restrictions offered by the software are removed after you root your phone. You can install third party apps, overclock your phone’s CPU and allow or block Super User permissions to any app after rooting. To Root Galaxy Note 3 Neo, you need to flash the CF-Auto-Root file on it with the help of Odin. Odin is Samsung’s official for flashing update files on Samsung Android Phones. So, let us start to Root Galaxy Note 3 N750 or N7505 without any delay. Before starting read the necessary instructions and disclaimer.
Disclaimer
- This method is only for Galaxy Note 3 Neo with model no N750 or N7505. Do not try this on any other model. You should only do this if you are an advance user and familiar with this kind of operation. If something wrong happens with your device during or after the process then droidopinions.com will not be held responsible. Rooting the phone will void its warranty and is an unofficial process.
Necessary Instructions before Proceeding
- Check the model of your phone first by going to settings>>about phone. Make sure it is SM-N750 or SM-N7505 then proceed.
- Backup your important data like pictures, videos, messages and contacts etc for safety.
- Charge your phone up to 60% to avoid power failure issues.
- Your PC should have Samsung USB Drivers installed.
Download Required Files
Download: CF-Auto-Root for SM-N750 (Lollipop 5.1.1)
Download: CF-Auto-Root for SM-N750 (Kitkat 4.4.2)
Download: CF-Auto-Root for SM-N7505 (Lollipop 5.1.1)
Download: CF-Auto-Root for SM-N7505 (Jellybean 4.3)
Download: Odin v3.09
Download: Samsung USB Drivers
Root Galaxy Note 3 Neo, Steps
To Root Galaxy Note 3 Neo, follow the instructions below carefully.
Step-1
- First download the CF-Auto-Root file compatible with your phone model and firmware. Extract the CF-Auto-Root file to get a file with tar.md5 file extension.
- Download Odin and extract it also.
Step-2
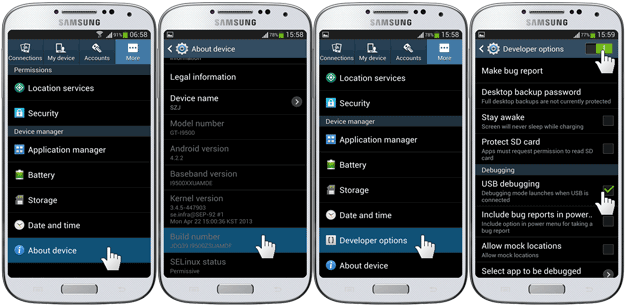
- On your phone go to the Settings>>About Phone, scroll down and tap on Build No seven times repeatedly. This will enable developer options on your phone.
- Now go back. Open Developer Options and enable USB Debugging mode.
Step-3
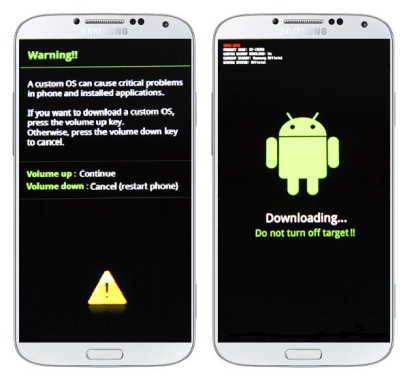
- Now turn off your phone.
- Enter into download mode by pressing and holding Home+Volume Down+Power button until a warning screen appears. Now press the Volume Up button to get into download mode.
Step-4
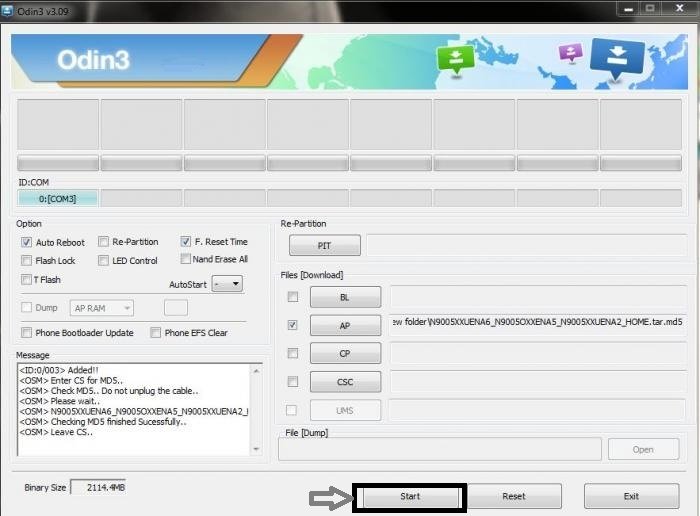
- After that Run Odin flash tool on your computer
Step-5
- Connect your Galaxy Note 3 Neo to the computer. Odin will detect your device and ID:COM box in Odin will turn blue.
Step-6
- After that click on the AP button in Odin and choose the extracted CF-Auto Root file which is in tar.md5 format, downloaded in the first step.
- Make sure Auto Reboot and F.Reset time is enabled and every other option is unchecked.
Step-7
- After selecting the file, click on the Start button to begin the process. Odin will start flashing the Auto Root file to Root Galaxy Note 3 Neo.
Step-8
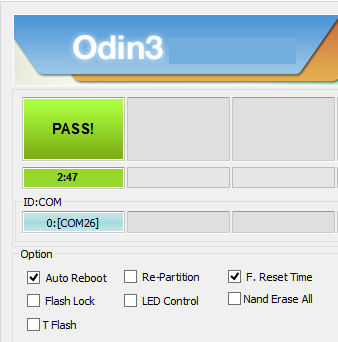
- Wait for some time till the process completes. When the process completes Odin will show the PASS message on the Screen.
Step-9
- Your device will now automatically reboot. disconnect the cable from the device. Wait for you device to show up the home screen. At first start you device might take some time to show the home screen so, have patience. And All Done!!
That is guide guys. The procedure to root Galaxy Note 3 Neo N750 or N7505 ends here. Now you have successfully rooted your galaxy note 3 neo. If you have any problems then ask in the comments below. Time to go now, Bye!!
Please Like, Share and Subscribe. Comment to share your views. Follow on twitter, facebook, GooglePlus.
Hi! On SM-N7505 KitKat which file you use to root?
The file that it’s for jellybean?
The kitkat root file link for N7505 is already given. Download the file and flash it with Odin on your Note 3.